Friday, June 29, 2007

Me as an M&M!


I just found the cutest thing...through the M&Ms website you can create your self to be an M&M---so of course I did it, and this is what I came out like!! This was so fun to do, it's kinda like playing with Mr. Potato Head but you don't have to worrying about loosing any pieces :0) You all should check it out and see what you come out as!!

Angels Wearing Chocolate


Yesterday I was craving some chocolate---surprise, surprise---when suddenly an angel called out to me. That's right an angel! She was the most beautiful thing I had ever seen. The sparkling white dress was the first thing that I noticed, it was so radiant I almost had to close my eyes. As she floated closer to me I could see her long beautiful legs which resembled the color of Hershey's Dark Cocoa Powder. Her hair finally became visible which were long, creamy, silky strands that were two-toned of powder white and cocoa brown. The closer she came I kept telling myself this had to be a dream, there was no way I was being visited by an angel! Bright Blue light surrounded her as she descended toward me landing on my kitchen table. Then the strangest thing happened, my vision blurred. For a minute I freaked out thinking that this angel had caused me to go blind, but au contraire. When I reopened my eyes I was relieved that I hadn't lost my sight at all and the angel that I had been so mesmerized by was now an issue of Cooking Light lying peacefully on my kitchen table. The front cover was brilliant blue with a picture of a Black and White Angel Food Cake and I knew right then and there that my goal in life today was to make that cake, so that's what I did, and was this cake a God send!!
While I don't have an Angel Food cake pan, I decided to make my cakes in two loaf pans, which turned out really nice. I also didn't have the ingredients that the recipe called for to make the cake, but I did have a lonely box of angel food cake mix in the pantry, so I quickly opened that baby up, dumped it in the mixing bowl added the water and some vanilla extract and let her ripe. After pouring half of the mixture into the pans I added my cocoa powder (and not having dark cocoa powder I just used the light cocoa powder). Once the powder was mixed I poured it over the white layer of angel food. Then I baked and ate!! Oh, the glaze for the cake is really easy too...which is all on the Cooking Light website.
This cake was so light, but still fluffy and had great texture. The taste was amazing too, never before had I had chocolate angel food, and now after having tried this recipe I don't know why! The chocolate was so decadent, but it was in angel food so I totally scarfed it up! This cake is a definite thumbs up!!

Thursday, June 28, 2007

Whose up for some Not-So-Fried Ice Cream?


Ok so here in New Mexico we have this dessert (which comes from Mexico) that is called Fried Ice Cream. I have to say that this dessert is one of my all time favorites. A ball of ice cream is encased in a bread crumb/corn flakish topping and deep fried until golden brown, and then is served in a crispy cinnamon tortilla shell with whipped cream and a cherry on top. (It is ok to drool, no one has to know) So seeing as how it's summer and all, I have had an outrageous craving for ice cream, so I wanted to make Fried Ice Cream, but try to do it in a way that wasn't going to be so detrimental to my waistline :0)---Yeah, yeah when you want Fried Ice Cream you shouldn't even be worried about your waistline, until I saw this figure friendly version of my most favorite Mexican Dessert. The recipe is from the Betty Crocker website and it's called Cinnamon "Fried" Ice Cream.


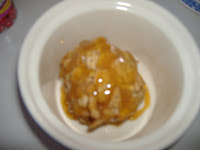
The reason why it's "Fried" in quotation marks is because the ice cream gets the same taste/texture as the original by using Cinnamon Toast Crunch!! I was thinking the same thing, these people at Betty Crocker are very clever!! Ok so you take the Cinnamon Toast Crunch, pour it in a bowl and crush it up with your hands, not to fine, because you still want some chunks. Then take you're vanilla ice cream balls (which I made even more healthy by using the Blue Bunny Fat Free with Splenda brand) and roll it into the cereal, making sure to smoosh the cereal into your ice cream ball. Place the finished ice cream in a jelly roll pan, cover and freeze for about 2 hours. Take 'em out and place then in the broiler for about 1 minute, just enough to give a little color to the cereal, but careful that the ice cream doesn't melt. And that's it!!!! Now top it anyway you like and eat-up!! I topped mine with Cool-whip Free, caramel sauce, honey and cinnamon!


I promise you that if you've ever had the original you won't be able to notice a difference! This recipe was so good and so satisfying! The ice cream was firm, but smooth and the cereal on it gave it this crunchy bite, but it was the drizzle of honey that totally made the dish!! I was trying to slowly enjoy each succulent bite I was putting into my mouth, but after the first bite I couldn't take it anymore...my sundae was devoured within seconds! And if you've never had the original this will definitely become a favorite of yours, but I've also given you the one good reason to come visit New Mexico, because while this recipe is super yummy, you still have to try the traditional fried ice cream!! Hope you all enjoy a classic taste from the southwest!

Wednesday, June 27, 2007

No Longer Top-Secret Bagel Challenge


Well it's finally here...the big day to reveal my first Daring Bakers Challenge and boy was it a doosey!! The challenge, which was presented to us by Jenny and Freya was to bake Real Honest Jewish Purist's Bagels. I must admit when I first saw the challenge I was really excited, because I had always wanted to make bagels but too afraid to try, but now I had my chance, and I wanted to prove to everyone that making bagels is not scary---which isn't totally true (I'll explain later).

So with my extremely high adrenaline, and anticipation to begin my first Daring Bakers Challenge, I began to go to work on my bagels. The first part of the bagel making process is to proof your yeast, and I must admit I've never been a fan, or very successful with yeast. So this first step had my biting my finger nails. But when I returned to my little yeast bowl and saw the bubbles forming I started jumping with joy (literally).

The next step was my favorite part because it was so messy and gooey...I loved it! I'm talking about hand-mixing in my flour to the yeast. Just to feel the warm yeast squirm in between your fingers while being gently caressed into a love affair with the added flour was so cool! Just make sure to use one hand for mixing and the other for dumping in the flour otherwise you'll have two gooey, mookey hands (not a good thing). Once you have all the flour, and I do mean ALL OF THE FLOUR (as many of us Daring Bakers came to find out), you need to let the dough rise. This part totally blew my mind because the dough rose in no time at all (Thanks to the 4 TBSP of yeast).

Ok, so once the whole rising process is complete it's time to make the bagels. I chose the snake method, only because I had seen it done on T.V. and wanted to try to make bagels the "professional" way. Up until this part of the challenge everything was going great, I couldn't believe I was actually making bagels! And the dough that I was "snaking" even looked like bagels. I was on my way to bagel success until I started the boiling process and everything went downhill from there. First of all, my bagels were floaters not sinkers, and I began to notice that after I boiled them the bagels had decreased in volume, they became really flat. Trying not to get flustered I continued the boiling process which just got messier and messier. Pieces of my bagels started to boil off of the actual bagel, there was dough everywhere...it was just not a pretty site.

So I took all of my boiled bagels and placed them on the cookie sheet and into the oven they went. When the timer went of and I opened the oven door my heart sank! What I found were flat bagels that were very had somehow gotten a better tan than I had. After letting them cool, I took a bite of one, and it didn't taste bad, but it did not have to texture of a bagel. My "bagels" were very dense and gummy and not something I would want to make again. My bagels days are over. And with this being my first Daring Bakers Challenge I'm wondering what I got my self into and am a little afraid for the next challenge. But should you wish to try the Daring Bakers Bagel Experience here's the recipe. Hope you have better results than I did!

Ingredients:
6-8 cups bread (high-gluten) flour
4 tablespoons dry baking yeast
6 tablespoons granulated white sugar or light honey (clover honey is good)
2 teaspoons salt
3 cups hot water
a bit of vegetable oil
1 gallon water
3-5 tablespoons malt syrup or sugar
a few handfuls of cornmeal


Equipment:
large mixing bowl
wire whisk
measuring cups and spoons
wooden mixing spoon
butter knife or baker's dough blade
clean, dry surface for kneading
3 clean, dry kitchen towels
warm, but not hot, place to set dough to rise
large stockpot
slotted spoon
2 baking sheets


How You Do It:
Step 1- Proof Yeast: Pour three cups of hot water into the mixing bowl. The water should be hot, but not so hot that you can't bear to put your fingers in it for several seconds at a time. Add the sugar or honey and stir it with your fingers (a good way to make sure the water is not too hot) or with a wire whisk to dissolve. Sprinkle the yeast over the surface of the water, and stir to dissolve.
Wait about ten minutes for the yeast to begin to revive and grow. Skipping this step could result in your trying to make bagels with dead yeast, which results in bagels so hard and potentially dangerous that they are banned under the terms of the Geneva Convention. You will know that the yeast is okay if it begins to foam and exude a sweetish, slightly beery smell.

Step 2- Make Dough: At this point, add about three cups of flour as well as the 2 tsp of salt to the water and yeast and begin mixing it in. Some people subscribe to the theory that it is easier to tell what's going on with the dough if you use your hands rather than a spoon to mix things into the dough, but others prefer the less physically direct spoon. As an advocate of the bare-knuckles school of baking, I proffer the following advice: clip your fingernails, take off your rings and wristwatch, and wash your hands thoroughly to the elbows, like a surgeon. Then you may dive into the dough with impunity. I generally use my right hand to mix, so that my left is free to add flour and other ingredients and to hold the bowl steady. Left-handed people might find that the reverse works better for them. Having one hand clean and free to perform various tasks works best.
When you have incorporated the first three cups of lour, the dough should begin to become thick-ish. Add more flour, a half-cup or so at a time, and mix each addition thoroughly before adding more flour. As the dough gets thicker, add less and less flour at a time.

Step 3- Knead Dough: Soon you will begin to knead it by hand (if you're using your hands to mix the dough in the first place, this segue is hardly noticeable). If you have a big enough and shallow enough bowl, use it as the kneading bowl, otherwise use that clean, dry, flat counter top or tabletop mentioned in the "Equipment" list above. Sprinkle your work surface or bowl with a handful of flour, put your dough on top, and start kneading. Add bits of flour if necessary to keep the dough from sticking (to your hands, to the bowl or counter top, etc....). Soon you should have a nice stiff dough. It will be quite elastic, but heavy and stiffer than a normal bread dough. Do not make it too dry, however... it should still give easily and stretch easily without tearing.

Step 4- Let Dough Rise: Place the dough in a lightly oiled bowl, and cover with one of your clean kitchen towels, dampened somewhat by getting it wet and then wringing it out thoroughly. If you swish the dough around in the bowl, you can get the whole ball of dough covered with a very thin film of oil, which will keep it from drying out.
Place the bowl with the dough in it in a dry, warm (but not hot) place, free from drafts. Allow it to rise until doubled in volume. Some people try to accelerate rising by putting the dough in the oven, where the pilot lights keep the temperature slightly elevated. If it's cold in your kitchen, you can try this, but remember to leave the oven door open or it may become too hot and begin to kill the yeast and cook the dough. An ambient temperature of about 80 degrees Fahrenheit (25 Centigrades) is ideal for rising dough.

Step 5- Prepare Water for Bagels: While the dough is rising, fill your stockpot with about a gallon of water and set it on the fire to boil. When it reaches a boil, add the malt syrup or sugar and reduce the heat so that the water just barely simmers; the surface of the water should hardly move.

Step 6- Form Bagels: Once the dough has risen, turn it onto your work surface, punch it down, and divide immediately into as many hunks as you want to make bagels. For this recipe, you will probably end up with about 15 bagels, so you will divide the dough into 15 roughly even-sized hunks. Begin forming the bagels. There are two schools of thought on this. One method of bagel formation involves shaping the dough into a rough sphere, then poking a hole through the middle with a finger and then pulling at the dough around the hole to make the bagel. This is the hole-centric method. The dough-centric method involves making a long cylindrical "snake" of dough and wrapping it around your hand into a loop and mashing the ends together. Whatever you like to do is fine. DO NOT, however, give in to the temptation of using a doughnut or cookie cutter to shape your bagels. This will push them out of the realm of Jewish Bagel Authenticity and give them a distinctly Protestant air. The bagels will not be perfectly shaped. They will not be symmetrical. This is normal. This is okay. Enjoy the diversity. Just like snowflakes, no two genuine bagels are exactly alike.

Step 7- Pre-heat Oven: Begin to preheat the oven to 400 degrees Fahrenheit.

Step 8- Half Proof and Boil Bagels: Once the bagels are formed, let them sit for about 10 minutes. They will begin to rise slightly. Ideally, they will rise by about one-fourth volume... a technique called "half-proofing" the dough. At the end of the half-proofing, drop the bagels into the simmering water one by one. You don't want to crowd them, and so there should only be two or three bagels simmering at any given time. The bagels should sink first, then gracefully float to the top of the simmering water. If they float, it's not a big deal, but it does mean that you'll have a somewhat more bready (and less bagely) texture. Let the bagel simmer for about three minutes, then turn them over with a skimmer or a slotted spoon. Simmer another three minutes, and then lift the bagels out of the water and set them on a clean kitchen towel that has been spread on the counter top for this purpose. The bagels should be pretty and shiny, thanks to the malt syrup or sugar in the boiling water.

Step 9- Bake Bagels: Once all the bagels have been boiled, prepare your baking sheets by sprinkling them with cornmeal. Then arrange the bagels on the prepared baking sheets and put them in the oven. Let them bake for about 25 minutes, then remove from the oven, turn them over and put them back in the oven to finish baking for about ten minutes more. This will help to prevent flat-bottomed bagels.
Remove from the oven and cool on wire racks, or on a dry clean towels if you have no racks. Do not attempt to cut them until they are cool... hot bagels slice abominably and you'll end up with a wadded mass of bagel pulp. Don't do it.
How To Customize Outside of Bagels: After boiling but before baking, brush the bagels with a wash made of 1 egg white and 3 tablespoons ice water beaten together. Sprinkle with the topping of your choice: poppy, sesame, or caraway seeds, toasted onion or raw garlic bits, salt or whatever you like. Just remember that bagels are essentially a savory baked good, not a sweet one, and so things like fruit and sweet spices are really rather out of place.

Wednesday, June 20, 2007

SHF: Favorite Most Craved Dessert


When I saw the new round for SHF was the favorite most craved dessert I knew I had to make something with chocolate. Anything that has chocolate in it is what I crave the most, and is my most favorite, so I don't necessarily have a "favorite" dessert. I guess I don't like the idea of being tied down to one dessert. I like variety, and since my taste bud cravings are constantly changing, there's no way that I can only pick one dessert that I crave all the time...especially since I'm a girl. Am I right ladies? There are certain times when I crave something extremely rich in chocolate, and other times when I want something a little more refreshing. So, back to the SHF challenge. This dessert I made almost a year ago, and wanted to revisit it for the SHF members, fans and followers. Since of course it has chocolate it already made the cut, but it also has Nutter Butters, Chocolate Pudding and Cool-Whip...I know, the combination is AMAZING! (And it's so easy to make) I now introduce the star of our show the one and only Nutter Butter, Chocolate Pudding Pie!!!!!!!!!!!! *ooh, aah* The crowd is on their feet, roaring with applause.


The recipe starts out with a premade Oreo cookie pie shell---SWEET Oreos!! Then comes the fun part---take two cups of milk and mix it with 2 (4 serving) packages of chocolate pudding (I go for the sugar-free pudding, because I like to save on calories so that I can have a bigger slice of pie). Mix the milk and pudding for about 2 minutes, don't freak out when the pudding become extremely thick, it's supposed to. (This is where I took a big spoonful of pudding and put it right into my mouth!!) Now the best part, take about 8 Nutter Butters and break them in half, arranging them on top of the pudding. Ok, next step is to take 1 1/2 cups of the pudding mixture and spoon it into the pie crust. Now take 1 1/2 cups thawed Cool-Whip and gently mix it with remaining pudding mixture, spoon the mixture over the Nutter Butter/Pudding mixture. Refrigerate for 3 hours, the cut it up and eat it!! Feel free to garnish pie slice with remaining Cool whip.

I promise you you'll have died and gone to heaven! This pie is so good, and if you use the SF pudding, the Cool-Whip Free and Skim Milk, you don't have to feel one bit guilty about eating a slice (or two, maybe even three)!

Monday, June 18, 2007

You Call That A Cookie?!


Cookie! Hah...try cake, yes that's right people I said cake! I don't see what the big deal is, people kinda freak out when you talk about jumbo cookies with frosting stacked together to make a cake. I like cookies and I like cake, so when I saw this amazing creation on Peabody's blog I had to try it. And I must say it was AMAZING! The chocolate peanut butter frosting is what really got me and turned this cookie into a masterpiece. It was rich, sweet, a little crunchy and oh so yummy for my tummy!! This is for sure a chocolate chip cookie on steroids, so I suggest you all go out and have yourself a little dose, I promise it won't hurt!! It may not give you bigger muscle but it sure will give you a bigger sweet tooth...which is why we're all here anyway right!

For My Daddy


Happy Father's Day!! For the best, most awesome, amazing, outstanding dad, I give to you Pecan Pie Bars. I made this recipe last year and my dad absolutely fell in love with it...it's now one of his favorite desserts. So on such a special day for such a special dad I decided to make the man what he wants---and I think you all can see why!! These bars are caramely, crunchy, gooey and a little salty all at once. And it's so cool that you can have the reminiscence of Thanksgiving any time of the year with these babies!! The shortbread crust is probably my favorite part, and if you're like me definitely make sure to grab yourself a corner slice of these bars, because that is the BEST part. I always try to save off the corners for me and give everyone else the other, less satisfying pieces :0). I got this recipe from the Martha Stewart website, which is listed as Pecan Bars. This recipe is very, very easy to make compared to other pecan bars I've made in the past. And I like that the shortbread isn't really, really thick, I think too thick of crust distracts from the "filling". I just wish I had a big scoop of vanilla or dulche de leche ice cream to go along side---MMMMM!!! BUt all of my baking, blogging and existence would not be possible without my amazing dad...so to you dad I say thank you for everything!! And enjoy